It's been a while since posting. Lots has gone on in the world since last time and I'm hopefully in a place where I can pick this up again and post more frequently.
As we head towards the winter in the UK I've been wondering about making the old gas boiler in my new house a bit smarter. I started off with LightwaveRFs L92 Smart Heating Switch. It's a good solution for controlling the radiator side of your central heating system especially if you already have LightwaveRF Gen2 devices and a simple central heating setup. You simply replace the existing thermostat with the L92, using the unused Earth wire as a neutral if it is not already and it will control your heating in a bit more of a smart fashion than before.
This was fine for the first few weeks and months of this year but as we head toward this winter I decided to move away from LightwaveRF devices simply because their integration with Home Assistant is lacking and receives no official support. The L92 was installed in the living room and thanks to the new air conditioning unit in there, there is no need for the radiators to be on so I have closed their valves. The choice is either to move it to another area e.g. the hallway or to use Home Assisant to call it and change it into switch mode. Then it dawned on me; if in switched mode why use it at all? The L92 requires the LightwaveRF hub and, for Home Assistant integration, internet access to control which isn't great when the internet gets a bit choppy at the new house. The other reason to switch away is that I want to control the DHW (Domestic Hot Water) and, ideally, the immersion heater as well for maximum automation and ease-of-use.
Enter Shelly. I should start by saying this is in no way sponsored by Shelly but I am blown away at how good their relays are for the price. Their Shelly Pro 4 PM was the quickly chosen device for this task (If you skip immersion you can go for a 3-way instead but you need 3 channels as I will explain below). The device is very well presented and has really good features but at the head of them all is locally-controlled integration with Home Assistant, excellent.
Before buying
Before ordering anything we need to get a grip on the wiring that already exists.
This is the sight I was greeted with opening the "wiring centre" of my current setup:

A dirty mess that doesn't make much logical sense even when looking closely. The biggest problem for me seemed to be in the form of a HW-Off that has to be normally closed when DHW is not calling for heat...
Thankfully google is here to help:
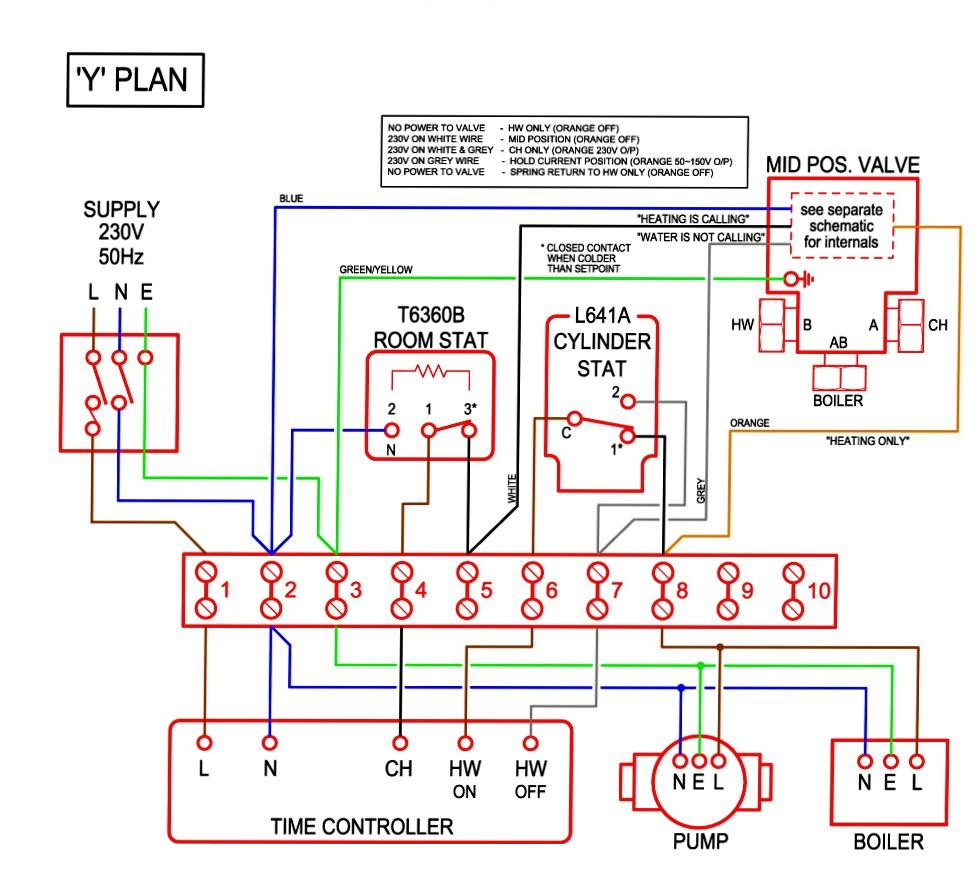
This wiring diagram was extremely helpful identifying why there is a need for a HW-Off cable as it didn't make sense until I read the top and discovered the grey wire is "hold-position" and not "go to DHW". From there it all fell into place and I could order the Shelly and get testing.
Fast forward a few days and it arrives in a very unassuming small box. First, wire in a L and N to a plug to power it up and join it to my network and Home Assistant:

The screen is cool but will spend most of its time off to save power. It's not a touch screen so any button presses will activate it if I need to manually turn any of the circuits on.
First Pass
The first iteration will be quick and dirty and just test that this will work as a boiler controller. First all of the L inputs on the top of the Shelly are bridged to a terminal block with equal lengths of strong 16A wire and then back out to the Central Heating terminal in the wiring center (don't get upset yet, it's just temporary). The Shelly Neutral can thankfully go straight into the Common Neutral terminal in the wiring center to bring the Shelly to life. The activation line for O1(Central Heating) will go to terminal 5 on the diagram above or the same terminal as the switched live from the room thermostat. In my case this is the switched live from the L92 which is still connected. Lastly the activation line for O2 and O3 will be for DHW-On and DHW-Off respectively. These will go into terminals 6 and 7 respectively on the diagram above. That's all for now and it's time to check the connections are good and tight then power the system back up. The old boiler timer which is right next to the boiler is still needed as Central Heating will need to be on for the Shelly and L92 to get their power but we'll get rid of that later. Here's the garbled mess of stage 1:

But it works well on the first run, able to control both Central Heating (radiators) and Hot Water circuits. A script either on the Shelly or an automation on Home Assistant will need writing to swap the DHW-Off if DHW-On is changed and vice-versa. I'm hoping Shelly will do a firmware update to allow us to put the channel names on the screen and disable channels so they can't be activated from the screen in the future.
While it works very well it's fairly simple and can be improved. The Radiator control will be performed by an automation in Home Assistant that will use the temperature sensors on the Dyson fans in my office and in the kids rooms to tell it when to turn on and off so that's covered but the Hot Water is still simply scheduled to come on and turn off at certain times. As shown on the diagram above the circuit runs through the Cylinder stat which is a screwdriver or thumbturn operated static temperature thermostat that will switch to position 1 when the temperature is lower than set and position 2 when it's higher.
Inputs
Off with the power at the mains again to make use of a really cool feature of this Shelly Relay; Inputs. Yes next to the Neutral terminal on the Shelly are 4 input terminals which will report to the device or, if you wish, directly control the state of the relay. Running the Cylinder stat Live wire directly into the now-common live terminal allows us to remove the cylinder stat from the Hot Water circuit and use it as an input. Cylinder Stat C from terminal 6 to terminal 4 (for now), Cylinder Stat position 1 wire from terminal 8 to Shelly input terminal 2 and Cylinder Stat position 2 wire from terminal 7 to shelly input terminal 3. Last thing before another power up is to move the Shellys activation line O2 from terminal 6 to terminal 8.
Time for another check and power-up and now the Cylinder stats state is determined by the inputs for DHW-On and DHW-Off. This will be useful in Home Assistant not only as a control for the Hot Water circuit but also to show you how long it takes to get the cylinder up to temperature and let you adjust your schedules accordingly. There are 101 ways of making use of this but for now my plan is to activate the hot water circuit if the radiator circuit is activated and the cylinder is cold. This way no gas is wasted only heating the radiators separately when it could be doing both and potentially save on a Hot Water activation later.
Here's an update on the mess at this point:

Ok that's the last photo of that car-crash I promise.
Local Device Setup
For the connection of the device and basic setup you'll only need a smart phone and a browser. First connect to the Shellys wifi network. It will create this acting as an access point on first start and you can disable it later. Once connected either browse to http://192.168.33.1 or, if using an android device, tap the network cog and tap manage router and it will take you straight there.
Once on you will see a pretty simple website. Your first port of call is the device button. In there you should look for auth and set up a password for device management. Even if you keep your devices on an IOT network you should protect individual devices to prevent cross-device attacks.
Next go to the network page, set a password on the access point network (preferably different to the auth password but it's your device) and then configure your wifi network in the infrastructure section. Once safely connected to your network, rejoin your wifi from your phone and then log in and disable the access point network and bluetooth from the same page. Note that if you have a LAN cable run you can have this Shelly device run from wired network too.
Lastly select each channel then channel settings and set the name of the channel and change input relay type to detatched. This will log input changes to Home Assistant but not cause the relay to activate.
Home Assistant Setup
On to Home Assistant setup now and the adding of the Shelly to Home Assistant is extremely easy. You can use MQTT if that floats your boat but the Shelly integration is locally controllable and only requires the device be given a static address, easy enough in the Unifi UI. Once you have your static, head to Devices and Integrations in Home Assistant and click add, search for Shelly and enter the address in the prompt. If you have given the Shelly a password (which you should definately do before going live. Find this under device>Auth on the devices webpage) enter that next and click continue then the device will be polled and added to Home Assistant. If you have given your devices channels names these will be populated in Home Assistant as well so I recommend doing this in the devices webpage too.
I already had an automation for the thermostat so decided to duplicate it and change what was needed then just add the Hot Water control to it afterwards. There is a lot of extra stuff in here to try and avoid radiator activations when the weather outside is warm etc but below is the .yml I used for the first setup:
alias: Heating - Smart Control - Relay
description: ""
trigger:
- platform: state
entity_id:
- schedule.central_heating
id: CH-Schedule
- platform: event
event_type: timer.finished
event_data:
entity_id: timer.thermostat_off_timer
id: CH-Off
- platform: state
entity_id:
- switch.waf_hcu01
id: DHW-Control
- platform: state
entity_id:
- schedule.hot_water
id: DHW-Schedule
- platform: state
entity_id:
- binary_sensor.waf_hcu01_input
id: DHW-Schedule
condition: []
action:
- choose:
- conditions:
- condition: trigger
id: CH-Schedule
sequence:
- choose:
- conditions:
- condition: state
entity_id: input_boolean.house_occupied
state: "on"
- condition: state
entity_id: input_boolean.central_heating_master
state: "on"
- condition: state
entity_id: schedule.central_heating
state: "on"
- condition: not
conditions:
- condition: and
conditions:
- condition: numeric_state
entity_id: weather.tomorrow_io_home_hourly
attribute: temperature
above: 15
- condition: numeric_state
entity_id: weather.tomorrow_io_home_hourly
attribute: wind_speed
below: 15
- condition: or
conditions:
- condition: numeric_state
entity_id: sensor.<kid1>_room_fan_temperature
below: 19
- condition: numeric_state
entity_id: sensor.<kid2>_room_fan_temperature
below: 19
- condition: numeric_state
entity_id: sensor.office_fan_temperature
below: 19
sequence:
- type: turn_on
device_id: *********************
entity_id: switch.ch
domain: switch
default:
- type: turn_off
device_id: *********************
entity_id: switch.ch
domain: switch
- conditions:
- condition: trigger
id: CH-Off
sequence:
- type: turn_off
device_id: *********************
entity_id: switch.ch
domain: switch
- conditions:
- condition: trigger
id: DHW-Control
sequence:
- choose:
- conditions:
- condition: device
type: is_on
device_id: *********************
entity_id: switch.waf_hcu01
domain: switch
sequence:
- type: turn_off
device_id: *********************
entity_id: switch.waf_hcu01_2
domain: switch
- conditions:
- condition: device
type: is_off
device_id: *********************
entity_id: switch.waf_hcu01
domain: switch
sequence:
- type: turn_on
device_id: *********************
entity_id: switch.waf_hcu01_2
domain: switch
- conditions:
- condition: trigger
id: DHW-Schedule
sequence:
- choose:
- conditions:
- condition: state
entity_id: schedule.hot_water
state: "on"
- condition: state
entity_id: input_boolean.house_occupied
state: "on"
- condition: state
entity_id: binary_sensor.waf_hcu01_input
state: "on"
sequence:
- parallel:
- service: switch.turn_on
data: {}
target:
entity_id:
- switch.waf_hcu01
- service: switch.turn_off
data: {}
target:
entity_id: switch.waf_hcu01_2
- conditions:
- condition: or
conditions:
- condition: state
entity_id: binary_sensor.waf_hcu01_input
state: "off"
- condition: state
entity_id: schedule.hot_water
state: "off"
sequence:
- parallel:
- service: switch.turn_off
data: {}
target:
entity_id:
- switch.waf_hcu01
- service: switch.turn_on
data: {}
target:
entity_id: switch.waf_hcu01_2
mode: queued
max: 5
Tidying up
That automation has been working great for a few days now although it's not been cold enough to activate the radiators yet (I have tested manually though). Now to tidy up the mess from earlier. The Shelly Pro 4 PM is a DIN rail device which is usually reserved for circuit boards but it doesn't have to go there. Amazon has a nice little 5-slot enclosure that looked perfect for the job here. The next day it arrived but before getting started on the tidy-up I wanted to get some terminal blocks for the enclosure too since there was some space and the lego-brick is a bit ugly. Another Amazon search shows my favourite terminal blocks come in DIN-mount form too. Another day while those were delivered and then I was ready for a tidy.
Power off first and while there at the isolator for the system I pulled off the old boiler controller/timer, disconnecting and terminating the HW-On and HW-Off wires then moving the CH wire over to a new terminal block to make it a permanent live. You can use the old HW wires as inputs for the Shelly if you want but I haven't done this. Close that panel and head back up to the wiring center.
Unscrewing the 2-gang junction box from the floor and pulling it up first I then disconnect and terminate the wires from the HW and L92 (room stat) leaving them in place but dead in case they are needed in future mods. This leaves us with only the useful stuff: cables for the Mains L and N, Boiler activation (yellow in my case), cylinder stat, water pump and mid position valve all now loose and ready to be put in their final positions.
A few screws to mount the new enclosure and some holes in the side to get the cables in then in goes the Shelly

Already looking pretty good sat in there but resisted the urge to fire it up and put the lid on until it was finished.
Now that the clutter cables are gone the earths can be terminal-blocked together first and moved out of the way. Next I used two of the DIN-mount terminal blocks joined with their bridge plate as the common Neutral to the left of the Shelly. Connect up the Neutrals from the isolator, Shelly, pump and valve to the four terminals. Since there is no other input for the CH or radiator circuit, the white cable from the valve can go directly into O1 on the Shelly. Similarly the Grey cable from the valve can go into O3 on the Shelly. Next up is The common Live which is another pair of DIN-mountable terminal blocks on the far right bridged and connected to the Shelly Live floating terminal block, the cylinder stat and the Mains Live from the isolator. Lastly is the Boiler and pump Activation. For Central Heating this is done via the Orange output from the valve but for Hot water this is bypassed so we need another terminal block to connect the orange wire from the valve to O2 on the Shelly, the live wire for the pump and the activation wire for the boiler (yellow in my case). The din-mounted terminal block is used here but since I don't have the room nor cable length to put another pair in I just used one to pass the yellow up to a floating terminal block.
The Final pic with a system check before closing the lid:

And the finished product:


A few cable-tacks will tidy up the cables in the airing cupboard and the finished product looks sleek and still allows for emergency control if the house wifi is down etc.
Hopefully this will help anyone wanting to get a bit more control over their dumb gas boiler at a time when prices are high this could save you some gas or at the very least let you know when and how you could save gas.
Thanks for reading.
o7
Footnote:
After living with it for a few months you should know the following:
1) Each Output should be bridged with an RC Snubber which you can buy from Shellys store here. I encountered an issue where the relay would crash in the event of a flip with built up residual current and these have permanently resolved this.
2) While re-wiring with the snubbers I went one step further and removed the mechanical logic from the circuit and just did all the intelligence in Home Assistant instead. Circuit diagram and automation yaml to follow.